portal.htmlinux.htm → gimp_versus_photoshop_1.htm  
Updated 5/May/2008
       
 
If we have the GIMP, why do we need photoshop?


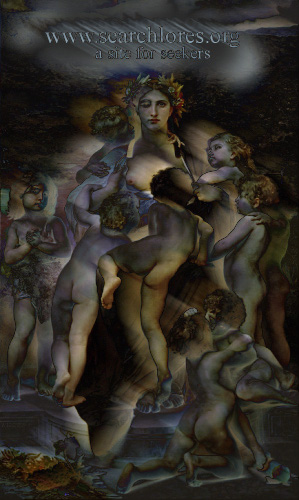
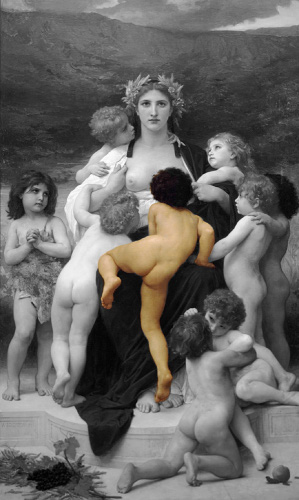
by fravia+, with the help of stream304 and others
First published at searchlores in May 2008


Introduction

Bag of tricks
Feathering     ••     General cleanup
Sharpening     ••     Local contrast
Non-Destructive Sharpening
Futuristic & Russian avantgarde
Black and white with color
Make Background transparent
Reflections     ••     Vignettes

Tutorials & books


Back to GNU/Linux portal


Introduction
If we have the GIMP, why do we need photoshop?
(in fact both are not quite comparable, because of their different targets)


Be warned: since I am not a digital graphic expert, some of the assertions on this section need to be taken cum grano salis. But I know how to search, and I can quickly spot, find and evaluate data, problems and trends on this web-netherworld of ours. Besides, searchlores has always had a rich "pictorial" aspect, and we have an interesting section, and many "challenges", about searching images on the web.

In fact this could be useful for the many, like me, that try to master a wondrous piece of software like the Gimp, the GNU Image Manipulation Program, in order to avoid to be chained to proprietary (and expensive, unless you steal it) software like photoshop.
Note that Gimp exists "native" both in windows and in GNU/Linux, while Photoshop itself can run in GNU/Linux through wine. So your Operating system choice does not limit you to the one or the other. I have used both programs for a long time, but I have only recently realized that, with very few exceptions, you can indeed, 99% of the times, use the Gimp for ALL your graphical needs.

Photoshop has been used for so long, especially during the prehistoric times, when commercial and proprietary software was still roaming the earth, that it is hailed around as THE photo-retouching and digital imaging tool par excellence, while in fact posessing -for those same "historical" reasons- a clunky and obsolete GUI.

For many people, the Gimp offers all the image manipulation tools they need: most of Photoshop's functions are present, and, even more important, Gimp's functionalities are being expanded all the time. This is a point worth underlining: since free applications (and free operating systems à la GNU/Linux) are being developed continuously, the future belongs to them, with bona pace of the obsolete commercial models.
It is worth recalling again that with the exception of features that depend on patented algorithms, Gimp is already now 99% on par with Photoshop in capabilities.

This said, the Gimp has indeed some missing features (coz proprietary and patented), but it does not matter much, for the reasons explained above: if Gimp does not do it already, then there is probably someone coding away furiously to make it happen, that's the power of open source. Note also that you can nowadays load up directly in Gimp any Photoshop plugin.

Besides, there are even things that Gimp does already now BETTER than Photoshop: Gimp's ability with retouching old photographs is extremely good, its handling of PNG is superior, its new screen grabber rocks.

A classical example of Gimp's shortcomings is the "bit depth problem" (lack of bit depths higher than 8-bit). Altough you can use the free Gimp fork cinepaint, and notwithstanding the fact that Gimp itself is now catching up, fact is that there is (yet) no CMYK support in Gimp, only RGB.
This topic is more important for DTP professionals than for other users (photographers, web artists, home users) because the graphics for print need to be delivered in TIFF CMYK format. Still, the lack of CMYK support in Gimp does indeed mean that for SOME (few) users, Photoshop remains a sine qua non.
Note that the Gimp has already a "separate plugin that allows some CMYK work to be done. Also the current revitalization of GEGL is a big step forward... maybe Gimp 2.6 or 3.0 will have CMYK and spot colors.

In short, if we would attempt a (rather useless) comparison: the Gimp would win in web graphics, because it's born for the web: more effective compression, higher quality, more web related operations.
Photoshop would win in big pictures management: its ad hoc algos are 10 times faster, as you notice when using -say- a 50,000*20,000 pixels image, and its CMYK support is intended for high end "gigantic" paper publishing.
Conclusion: They are not quite comparable, because of their different targets. In other words: The Gimp will do everything outside of commercial printing. If you're not producing a print publication... use the Gimp. Unless you want to pirate software, there is no reason to use Photoshop..


Our aim, here, is to quickly demonstrate to the unwashed some interesting things they can accomplish with Gimp.
Some -almost obvious- warnings for beginners:
You should always work on a copy, never on your original image. And it is a good idea to create first of all, just in case, a Duplicate Layer.
Note that most file types lose information every time you save them. So avoid saving and re-saving in jpg or png.
If you are not completely done with your image use .xcf which is the Gimp format, that will save all information, including all your layers.
Save your work as a jpg (or tiff or gif) ONLY when you are finished and ready.


Bag of tricks
"quickies"


Feathering     ••     General cleanup     ••     Sharpening     ••     Local contrast
Non-Destructive Sharpening     ••     Futuristic & Russian avantgarde     ••     Black and white with color
Make Background transparent     ••     Reflections     ••     Vignettes

Here are some interesting "quickies"

Feathering images for text
Artistically erase part of an image, shaping it to fit the space or allow the insertion of text.
put the swipe on the right, where it feathers naturally into the ragged text, or on the bottom (or top) of the page, not on the left!
You can also use an oval: it creates a soft spot- light that places focus on the image.


Hard edge: lasso ÷> cut
Soft edge: lasso ÷> select ÷> feather ÷> cut


General cleanup for noise
You use Selective Gaussian Blur to clean things up.
With selective Gaussian, you have two options, Blur Radius and Max Delta. You may lock these two values together, and/or you can play with them to your liking.
Since this is such an intensive computing process, you'll probably want to UNcheck "preview" as you experiment, otherwise if you use the mouse to change values, the process computes each time you change the values.
Values: Blur Radius - 3 to 12; Max Delta - 3 to 12
You can start out with something like 7 & 7 and move up or down from there. Remember to UNDO your changes first, if you want to try a different set of values


Filters ÷> Blur ÷> Selective Gaussian Blur
Blur Radius - 3 to 12
Max Delta - 3 to 12

Note that some like to do noise reduction before scaling, while others like to blur after scaling. It's up to you.
However, if you perform a selective gaussian blur to reduce noise, you still may want to perform a slight sharpening as your last step in the workflow. What you don't want to happen is to start sharpening those artifacts you were trying to get rid of in the first place.


Sharpening
Most photographers use sharpening techiques as the LAST step. Sharpening will enhance the overall realism. Sharpening is a "destructive" process - that is, while it will bring back the realism, once sharpening has been performed, there is rarely any way to further modify the image with a satisfactory result.
Normally, all images, or specific areas within images, need some amount of sharpening due to the way a camera dulls the edges of objects during the capture process to help avoid moire-patterns or other artifacts. Foliage in particular seems to "pop" to life after you've applied a small amount of sharpening yourself.


Filters ÷> Enhance ÷> Unsharp Mask
(Unsharp Mask: Just like Gnu's not unix, Unsharp Mask actually sharpens your image. It is a holdover nomenclature from the printing industry)
Radius = 0.5
Amount = 0.5 v
Threshold = 0 (4 or more if you use selective gaussian blur)


Note that we are sharpening an entire image. As you advance, you'll probably finding youself doing selective sharpening on areas of the image that need it, such as eyes and teeth only, rather than applying it to the whole image.


Local contrast
Now that Unsharp Mask has been introduced, we can use it with grossly exaggerated values to achieve a favorite effect: local contrast (that has little to do with sharpening). It can cut down fog, haze, smog, and/or provide that "edge" of realism that can give your image some 3D look. Used tastefully, it is something that can push your images into the "man, there's something about your pictures I can't describe that just make them stand out."
Applying local contrast is very easy. Just bring up Unsharp Mask Code: and set the RADIUS value to a ridiculous value of 60 (sixty), set the Threshold value to 0 (zero) and change the AMOUNT to anwhere from 0.07 to 0.15 (or maybe a little more) according to your tastes.


Local contrast "brings some 3d-pop back into most images"
Filters ÷> Enhance ÷> Unsharp Mask
Radius = 60
Amount = 0.1
(turn off preview! )


Non-Destructive Sharpening
Layer ÷> Duplicate Layer
Filters ÷> Distorts ÷> Emboss
Emboss
Azimuth = 0
Elevation = 45
Depth = 1
CTRL+L for Layer dialog and
Layer Mode = Hard Light or Grain Merge (with varying levels of opacity, for instance 2.8)


You can simulate the high pass filter in GIMP using the following method:

1. Duplicate the image
2. Using the duplicate open the layers dialog and select "Duplicate Layer"
3. Gaussian blur the top layer, you can experiment to find good values, try 6x6 pixels and go from there.
4. Invert the top layer Layer ÷> Colors ÷>Invert
5. Blend using the layer dialog to 50%
6. Flatten the image.

The dupe will now be your high pass filter image.


Futuristic & Russian avantgarde
In Filters -> Artistic Gimp offers a lot of different styles, i.a. Van Gogh, Impressionist and Cubism, but this one, that I have created, was missing :-)


Layer ÷> Duplicate Layer
Filters ÷> Blur ÷> Motion
Length = 27
Angle=30
CTRL+L for Layer dialog and
Layer Mode = Difference (with high opacity, for instance 83)


Black and white with color
Duplicate your image: Image ÷> Duplicate
Blackandwhitize the new copy: Image ÷> Mode ÷> grayscale
Make a copy in Memory of your gray image: Edit ÷> Copy
Back to color image: Add a transparent layer: Layers ÷> New Layer
select Transparency as your Layer Fill Type
Paste your black and white image from memory to new layer: Edit ÷> Paste
Anchor the image: Layer ÷> Anchor Layer (in gimp layers float)
Now erase ONLY the parts of the black and white image that you want to have in color


Make Background transparent
       
 
"Transparentize"
You have a photograph or image of something on -say- a white background, and you would like to make that background transparent so that you can lay your image onto another, different, image.


Convert the image to RGB mode if it's not already
Select the white region by color: Select ÷> Color
Select by ÷> Composite
Threshold ÷> around 15
In the Layer ÷> Transparency menu, add an alpha channel
In the same menu, set "Color to alpha"
This will make the white background to transparent
Save as png file


Reflections
Gradients allow to create "fading" effects, very useful when you want to blend two images together. You can therefore use gradients in a layer mask to combine two layers smoothly. You can for instance use a gradient and two similar shades of blue to make a very realistic sky (solid-colored skies don’t look realistic). Here we will use the gradient tool to create a specular image.


Copy and paste your "top part" inside a new image (double height)
Duplicate its layer: Layer ÷> Duplicate
Vertically flip the new layer: Layer ÷> Transform ÷> Flip vertically
Position (move) the new flipped layer under the original one: Use "move" tool
Very important: right click the flipped and moved layer and select "Add Layer Mask"
Also select the option "White(Full opacity)"
Make sure that the flipped layer's mask is selected and choose the Gradient Tool
Make sure the selected colors are Black and white
Use the gradient tool "dragging" from the bottom towards the top in the middle of your flipped image.
Merge everything.

It helps to use the Control key while dragging your gradient, to help get a gradient that’s exactly vertical.
 
       
You can also additionally 'shorten' and 'skew' the reflected layer with
Tools ÷> Transform Tools ÷> Scale (only modify: scale ratio Y)
Tools ÷> Transform Tools ÷> Shear (only modify: shear magnitude X)

Be careful to scale it only vertically and to shear it only horizontally. After you apply the shear effect, move the reflection in order to put it back under the original.


Vignettes
Rectangle select tool ÷> selection of frame
click on the quickmask icon (lower left corner of any image)
Filters ÷> Noise ÷> Spread
Horizontal = 16
Vertical = 16
Toggle quick mask off (lower left corner icon)
Select ÷> Invert
Edit ÷> Fill with BG colour


using different filters:


Get several images out of one original
the slices will have a built-in unity of color and texture, allowing them to work easily together
Up close, an ordinary image is a surprising potpourri of lines, shapes, colors, curves, corners and edges.

In the example note how you can geometrically relate (or even combine) totally different parts of the same image using its own colors and textures.


Tutorials and books
Learn by doing


The one reason many are tempted to (pirate and) use photoshop instead of the Gimp is that there are a gazillion tutorials and support for photoshop that they have not been able to find for its open-source alternative.
It is a vicious circle: photoshop has a massive user base and for that reason, is far easier to find help, addons and support for Adobe's proprietary software than for programs like the GIMP.
This is gonna change, because more and more people are now using GNU/Linux and therefore, eo ipso, the GIMP.
Let's help: here is our small crumb of contribution...


Tutorials
http://docs.gimp.org/en/index.html: Gimp's User Manual (check especially the layers paragraph)

http://mmmaybe.gimp.org/tutorials/

http://gimpguru.org/Tutorials/

http://gimpology.com/: Gimpology's tutorials

http://www.gimptalk.com/

http://www.gimp-tutorials.com/

http://www.gimptalk.com/forum/forum/GIMP-Tutorials-and-Tips-8-1.html

http://gimp-tutorials.net/

http://www.pixel2life.com/tutorials/Gimp/All/: Pixel2life Gimp's tutz


Books
http://docs.gimp.org/en/:The Gimp user manual

http://gug.sunsite.dk/docs/Grokking-the-GIMP-v1.0/: Grokking the Gimp


Scripts
http://gug.sunsite.dk/scripts.php?PHPSESSID=99299b6d747da0a1e4dc7eccb8da6688: Gimp User Group's Script-Fu library

http://registry.gimp.org/forum Gimp's plugins Registry


Fora
http://gug.sunsite.dk/forum/: Gimp User Group's Forum


Petit image

(c) 3rd Millennium: [fravia+], all rights reserved, reversed, revealed and reviled